
මේ පටන්ගන්නෙ අලුත් දෙයක්…මේ දවස් වල Web Trend එක තමා MEAN.. මොකද්ද මේ MEAN..MEAN කියන්නෙ Web Application Development සදහා නිර්මනය උනු JavaScript Technologies කිහිපයක එකතුවක්…PHP Development වලදි HTML,PHP,MySql භාවිතා වෙනවා වගේම මෙහෙදි බාවිතා වෙන්නෙ JavaScript…
MEAN
- M – MongoDB
- E – Express Js
- A – Angular Js
- N – Node js
MongoDB
MongoDB කියන්නෙ Nosql Category එක යටතේ තියෙන Document–oriented database එකක්…PHP වල MySql බාවිතා කරා වගේම මෙහිදි database එක වෙන්නෙ MongoDB.
Express.js
Express Js නෑත්නම් Express කියන්නෙ Node Js සදහා නිර්මානය උනු Framework එකක්..PHP වලදි Laravel,Codeiniter හාවිතා කරනවා වගේම මෙහිදි බාවිතා කරන්නෙ Express Framework එක.
Angular Js
Angular කියන්නෙත් Framework එකක්..මෙහි විශෙශත්වය තමයි මේක බාවිතා කරන්නෙ Front-End එකට…HTML Template language එක වශයෙන් භාවිතා කරලා සාමන්යය HTml වලින් ඔබ්බට ගිය syntax භාවිතයක් තියෙන JavaScript MVCFramework එකක්.. Google වලින් තමා Angular හන්දුන්වා දුන්නේ..
Node Js
අපි JavaScript භාවිතා කරේ Client Side එකට..නමුත් JavaScript භාවිතා කරලා Server Side Environment එකක් හදාගන්න Node Js හරහා අවස්තාව ලබා දිලා තියෙන්වා..සරලව අපේ Web Application එකේ Server Side එකට PHP,ASP.NET භාවිතා කරා වගේම මෙහිදි භාවිතා කරන්නේ Node Js.
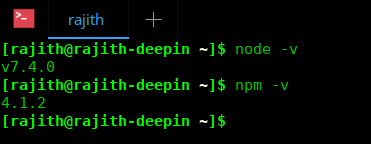
මෙතනින් Nodejs install කරගන්න.Node Js install කරනකොටම එයට අදාල Package Manager එක(npm- node package manager) install වෙනවා..application එකට අපිට අවශ්ය package install කරන්නේ මේ node package manager එක හරහා.
install කරගත්තට පස්සේ මේ විදිහට version එක බලලා confirm කරගන්න පුලුවන්.
කොහොමද පටන් ගන්නේ..
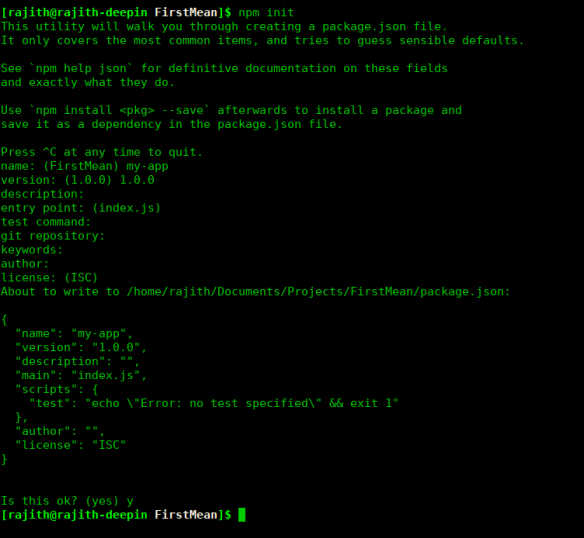
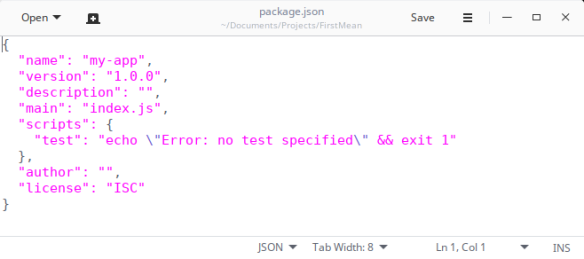
මුලින්ම අපිට අවශ්ය වෙන්වා අපි භාවිතා කරන dependencies ටික තියාගන්න.එකට අපි භාවිතා කරන්නෙ package.json file එක.npm inti වලින් අපිට අවශ්ය package.json file එක හඩගන්න පුලුවන්.project එකේ folder එකට navigate වෙලා terminal එකේ npm init command එකෙන් මෙ file එක හදාගන්න පුලුවන්.
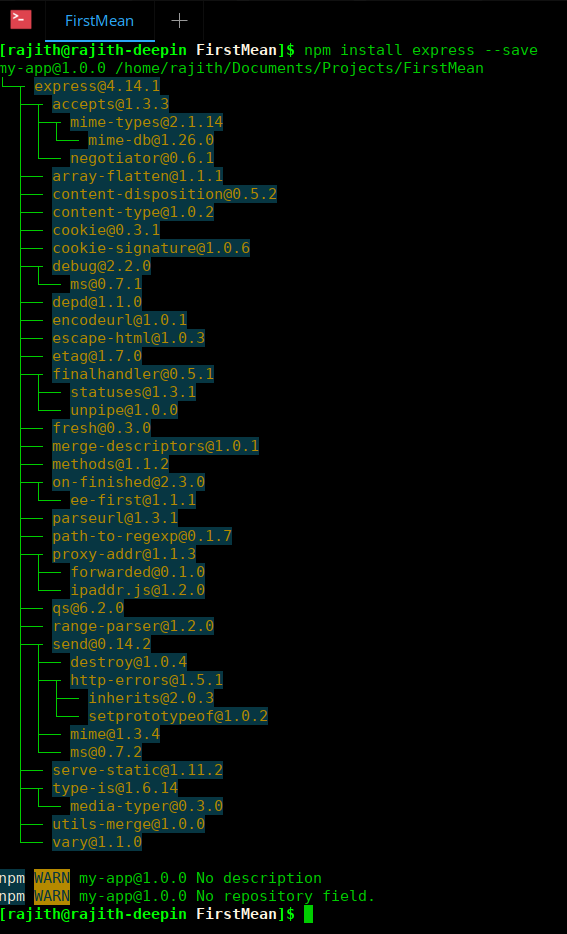
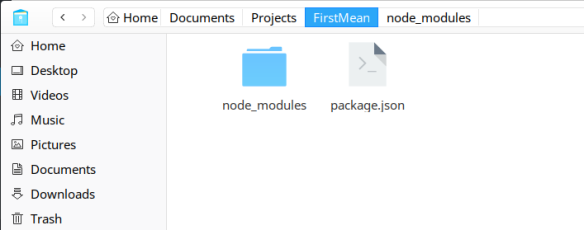
දෑන් අපිට අවශ්ය ඔනම package එකක් install කරන ගමන් ඒක package.json file එකේ save කරගන්න පුලුවන්..ඉලගට අපිට අවශ්ය express install කරගන්න එක..project folder එකෙන් terminal එක open කරගෙන npm install express –save command එකෙන් express install කරන්න පුලුවන්. –save මගින් වෙන්නෙ package.json file එකේ package එක save වෙන එක.එ සමගම node_modules folder එකක් හදෙනවා..අපි install කරන package ඔක්කොම store වෙන්නේ node_modules folder එකේ.
ඉලගට අපිට server එකක් අවශ්ය වෙන්වා.project root එකෙ app.js file එකේ මේ code එක දාගන්න..
var express = require('express');
var app = express();
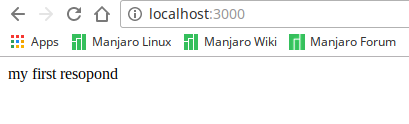
app.get('/', function (req, res) {
res.send('my first resopond');
});
app.listen(3000,function(){
console.log("listening to port 3000");
});
මෙහිදි වෙන්නේ අපි install කරගත්ත express package එක require කරගෙන එයින් අලුත් object එකක් හදාගෙන තියෙන එක..terminal එකේ node app.js command
එකෙන් file එක run කරන්න ඔන.
මෙහිඩි වෙන්නේ server එක start වෙල port 3000 වලට listen කරන එක..browser එකෙ port 3000 හරහා root url එක (/) සදහා respond එක ලෙස my first resopond ලබා දෙනවා.
server එක හරහා HTML,CSS files run කරවන්න ඔන..එ නිසා express වලට static files run කරන්න අවශ්ය code එක ලියන්න ඔන..public folder එක අතුලේ තමා ඔක්කොම HTML,CSS files තියගන්නේ..
app.js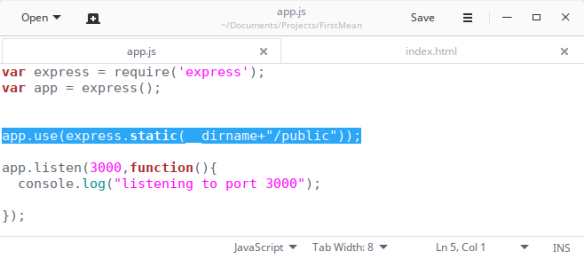
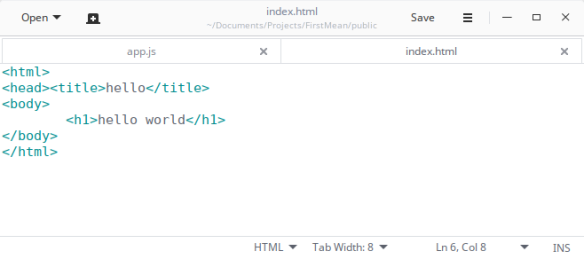
public/index.html
 server එක restart කරන්න.
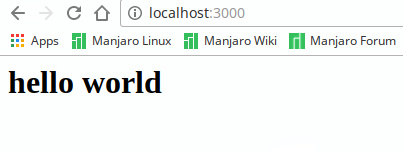
Angular js සහ MongoDB භාවිතය
හදාගත්ත index.html file එකට සාමන්ය JavaScript file එකක් Link කරනවා වගේ angular CDN ලින්ක් එක දාන්න පුලුවන්..
එ වගේම මේ උදාහරනයට Bootstrap,JQuery අවශ්ය වෙනවා..index.html එකට අවශ්ය සම්පුර්න code එක..
<!DOCTYPE html>
<html ng-app="myfirstmean">

<head>
 <meta charset="UTF-8">
 <title>Document</title>
 <link rel="stylesheet" href="https://maxcdn.bootstrapcdn.com/bootstrap/3.3.7/css/bootstrap.min.css">

</head>

<body>

<div class="container">

<div class="row">

<div class="col-md-6">


<form ng-controller="addcontrolle" ng-submit="addData()">


<div class="form-group">
          <label for="">Name</label>
          <input type="text" class="form-control" ng-model="user.name">
        </div>


<div class="form-group">
          <label for="">Email</label>
          <input type="text" class="form-control" ng-model="user.email">
       </div>


       <button type="submit" class="btn btn-warning">Add</button>
   </form>

 </div>


<div class="col-md-6">


<table class="table table-striped">

<thead>

<tr>

<th>Name</th>


<th>Email</th>


<th>Actions</th>

          </tr>


      </thead>


<tbody>

<tr>

<td>rajjith</td>


<td>rajith@gmail.com</td>


<td><button type="button" class="btn btn-success">Edit</button>
                <button type="button" class="btn btn-info">Delete</button></td>

            </tr>

          </tbody>

    </table>

 </div>

</div>

</div>


<script  type="text/javascript" src="https://ajax.googleapis.com/ajax/libs/angularjs/1.6.2/angular.js"></script>
 <script type="text/javascript" src="https://code.jquery.com/jquery-3.1.1.js"></script>
 <script type="text/javascript" src="https://maxcdn.bootstrapcdn.com/bootstrap/3.3.7/js/bootstrap.min.js"></script>
 <script type="text/javascript" src="./controllers/main.controller.js"></script>
</body>

</html>
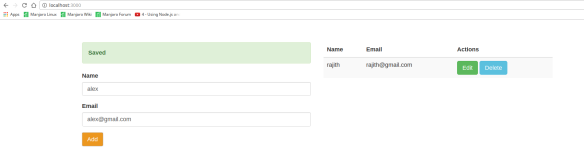
index.html view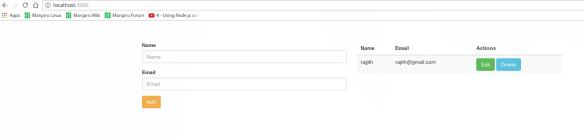
ng-app
ng-app වලින් තමා angular application එකේ root එක හොයගන්නේ..angular භාවිතා කරන්න නම් අනිවර්යයෙන්ම root එකක් define කරලා තියෙන්න ඕන..එක html එකකට තියෙන්න පුලුවන් එක ng-app directive එකක් විතරයි.
ng-controller = “addcontrolle”
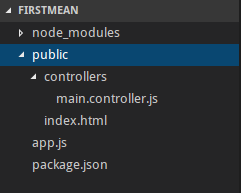
ng-controller එකෙන් කරන්නේ මේ application එකට භාවිතා කරන්නේ මොන controller එකද කියන එක define කරන එක.controllers folder එකේ main.controller.js file එකේ තමා අපිට අවශ්ය controller එක තියෙන්නේ.controller එකේ නම addcontrolle.
එ නිසා main.controller.js file එක html file එකට ලින්ක් කරන්න ඕන..
http://./controllers/main.controller.js
ng-submit
ng-submit එකෙන් වෙන්නේ form එකේ submit button එක click කරාම කලින් define කරපු addcontrolle එක අතුලේ තියෙන addData function එක run වෙන එක..
ng-model
php වල name tag එකෙන් input fields වල values ගන්නවා වගේ angular වල ng-model directive එකෙන් තමා html input fields වල values ගන්නේ.
ng-model = “user.name” සහ ng-model = “user.email”
user.name,user.email වලින් කරන්නේ Controller එක අතුලේ user object එකක් හදාගෙන එකේ properties වශයෙන් name සහ email එකට අදාල values තියගන්න එක.අවසාන output එක වෙන්නේ
user = { name:”name value”, email : “email value” }
මෙ නිසා අවසානයෙදි user object එක අතුලේ form එකට අදාල සියලුම data තියෙනවා..එ නිසා එක input field එකෙන් එකට අදාල values ගන්න ඕන නෑ.
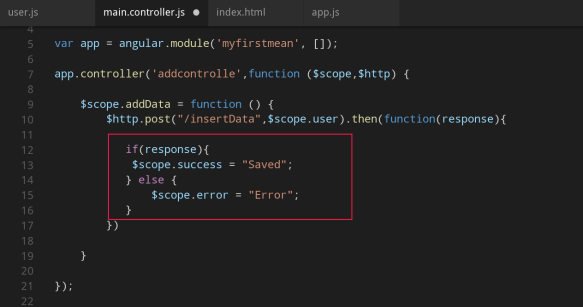
main.controller.js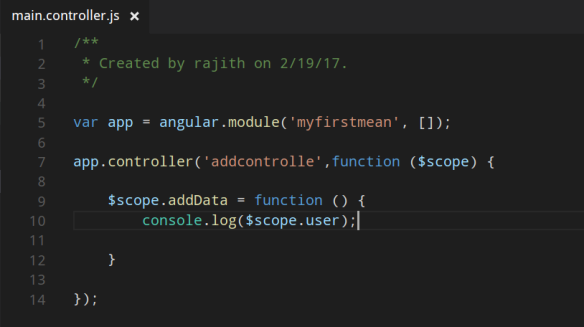
angular.module
Angular part එක පටන් ගන්න කලින් මුලින්ම කරන්න ඔන දේ තමා මේක..application එකට අවශ්ය modules register කරන්න ඕන..ඒක කරන්නේ මේ විදිහට..
var app = angular.module('myfirstmean', []);
myfirstmean application එක මුලින්ම register කරන්න ඕන..අපිට අවශ්ය modules තියෙනවනම් [] තුල inject කරන්න ඕන..උදාහරණයක් ලෙස ngRoute module එක භාවිතා කරනවනම්..
var app = angular.module('myfirstmean', ['ngRoute']);
$scope
View සහ Controllers සම්බන්ධ කරන්නේ scope හරහා..contoroller එකට argument එකක් ලෙස $scope ලබාදුන්නම $scope හරහා view එකට access කරන්න පුලුවන්.. මෙහිදි $scope හරහා addData function එක bind කරලා තියෙනවා..එ වගේම කලින් හදාගත්ත user object එකත් $scope හරහා ලබගන්න පුලුවන්.
දෑන් form එකේ input fields පුරවලා add එක click කරලා developer tools වල console tab එකෙන් බලන්න..input fields වල data,object එකක් විදිහට angular වලින් අරන් තියෙන්වා..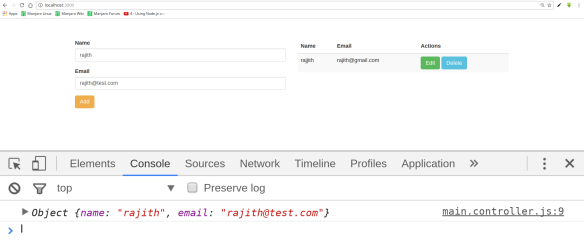
$scope.user.name ,$scope.user.email හරහා එකින් එක ගන්නත් පුලුවන්..
Node js වලින් මෙ request එක ගන්නේ කොහොමද?
Node js වලින් මෙ request එක ගන්න කලින් angular වලින් මේ data HTTP request එකක් විඩිහට send කරන්න ඕන..ඒක කරන්නේ මේ විදිහට..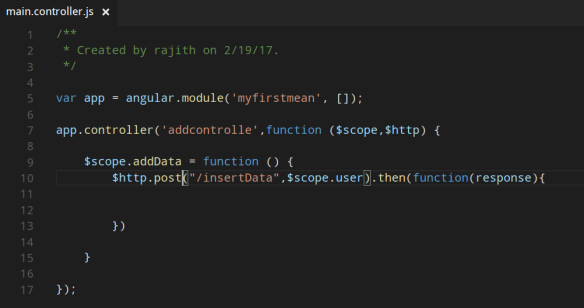
$http වලින් server එකට reequest එකක් යෑවිම සහ response එකක් ලබාගෑනිම සිදුවෙන්නේ..එ නිසා argument එකක් විදිහට $http object එක ලබාදෙන්න ඕන.post request විදිහට එකට තමා request එක යවන්නේ..
Node js + express වලින් කොහොමද request එක handle කරන්නේ..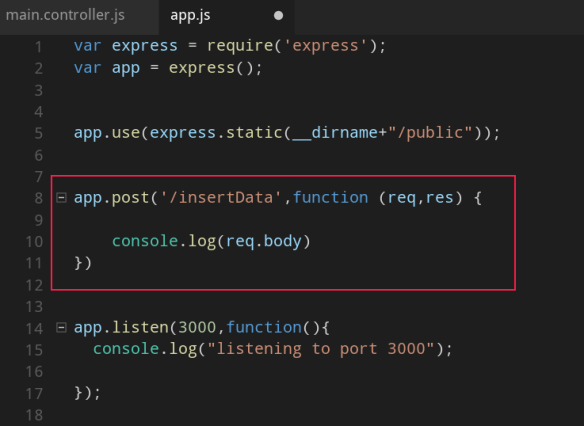
angular වලින් එන request එකෙ node වලින් ගන්නේ මේ විදිහට..එ වගේම එන request එකට response එකක් යවන්නත් ඕන..එ නිසා තමා req,res arguments pass කරලා තියෙන්නේ..නමුත් req.body මගින් request එකේ body එක console කරාට output එක undefined කියලා එන්නේ..එ ඈයි?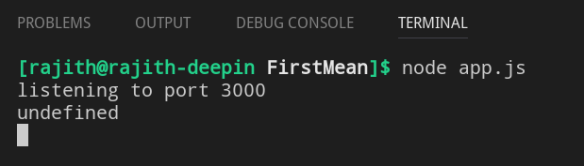
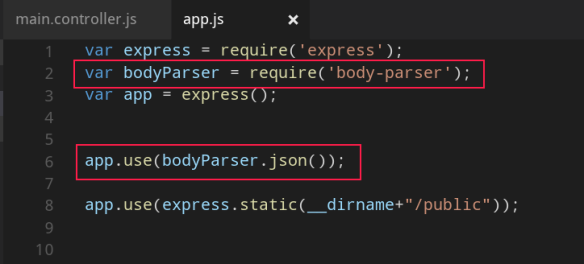
ඒකට හෙතුව තමා request එකේ body එක pass කරන්න අපිට තව package එකක් අවශ්යයි..එ තමා body-parser .. npm install මගින් body-parser කරගෙන require කරගන්න වගේම express වලටbody-parser configure කරන්නත් ඕන..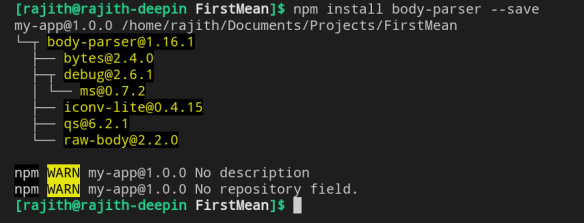
 දෑන් server එක restart කරලා angular වලින් add button එක click කරලා request එකක් එවලා බලන්න..request එකේ body එක console එකේ බලගන්න පුලුවන්..
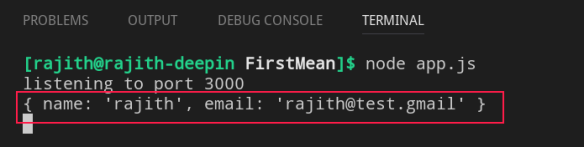
MongoDB වලට මේ Data insert කරන්නේ කොහොමද?
මුලින්ම MongoDB install කරගන්න ඕන..එ වගේම mongo server එක run වෙන්නත් අවශ්යයි..
install and run mongodb on windows
install and run mongodb on linux
Mongo Database එක connect කරන්න ඕන..ඒකට අපි තවත් package එකක් භාවිතා කරන්වා..එ තමා mongoose..mongoose කියන්නේ MongoDB Driver එක මත නිර්මානය උනු Object Modeling Tool එකක්..මෙහි ප්රදානම වාසිය තමා schemas හදාගන්න පුලුවන් වීම..
mongo connection
install mongoose![]()
require and connect to mongodb.
Default Mongodb Port එක 27017 සහ database එක firstMean. SQL වගේ Database එකක් හදාගෑනිම අනිවර්ය නෑ.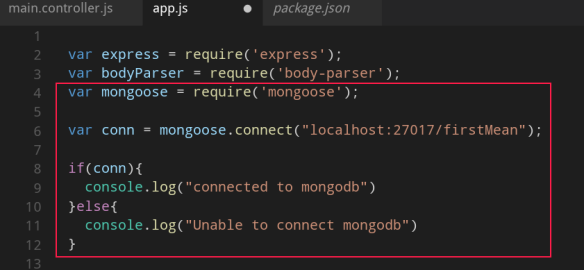
 දෑන් Angular request එක හරහා එන data, mongodb වල firstMean Database එකට insert කරන්න පුලුවන්..නමුත් සමන්යය sql භාවිතයෙදි table එකක් අවශ්යයි..එ වගේම mongo වලත් collection එකක් ඕන..table එකක් හදන්වා වෙනුවට අපි කරන්නේ schema එකක් හදන එක..
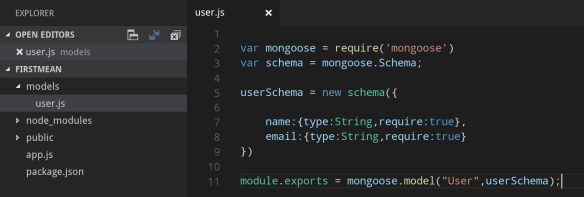
module.exports = mongoose.model(“User”,userSchema);
මේකෙන් කරන්නේ හදගත්ත Userschema එක User විදිහට භාවිතා කරන්න පුලුවන් වෙන්න export කරන එක.
දෑන් අපිට Data insert කරන්න පුලුවන්..එකට මුලින්ම export කරපු schema එක require කරන්න ඕන..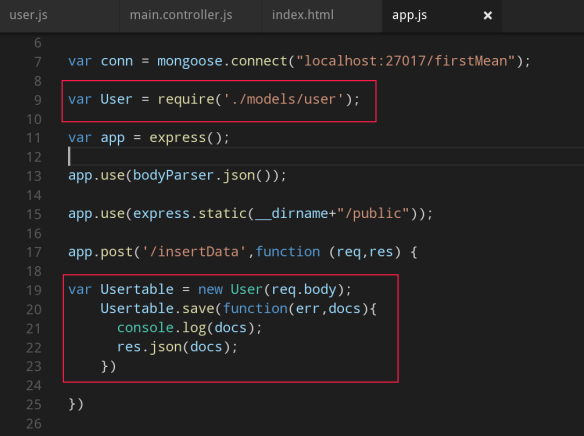
Usertable කියන User object එකට request එකෙන් ආව body එක pass කරන්න ඕන..UserTable.save() මගින් document insert කරන්න පුලුවන්..එ සමගම අපි response හෝ error එකක් ගන්නවා execution එකේ..function(err,docs) වලින් කරන්නේ ඒක..හරියට insert උනානම් docs response එක එන්නේ අපි insert කරපු document එකමයි..res.json(docs) වලින් අපිට ආපු response එක json විඩිහට angular request එකේ response එක විදිහට යවන එක කරන්නේ..
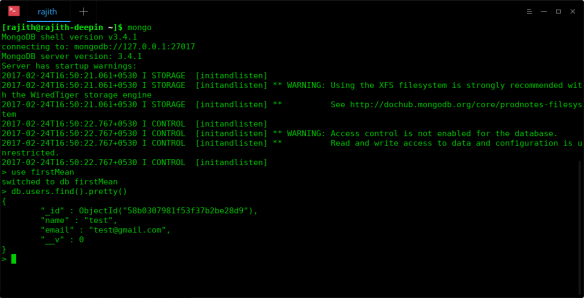
angular වලින් එන response එක සහ docs response එක console කරලා බලන්න පුලුවන්..name=”test” email=”test@gmail.com”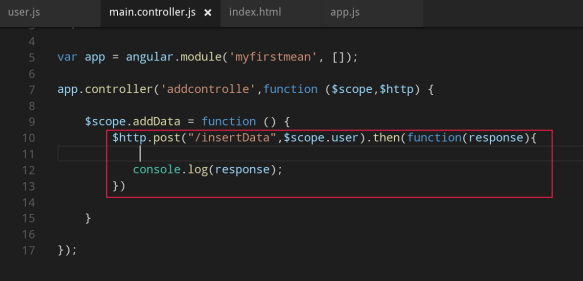
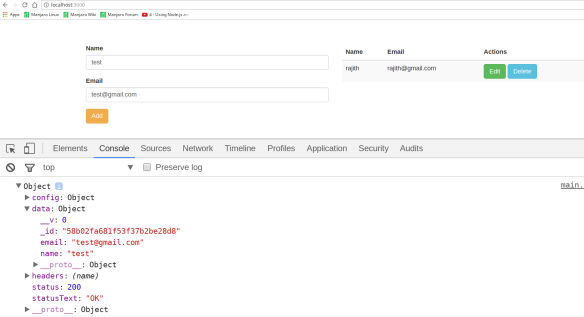

Mongo shell එකෙන් අපි submit කරපු data insert වෙලාද කියලා බලන්න පුලුවන්..
අවසන් වශයෙන්.. අපිට Success හෝ Error message එකක් පෙන්නන්න පුලුවන්..ඉතාම ලෙසියෙන් $scope භාවිතා කරලා මේක කරන්න පුලුවන්..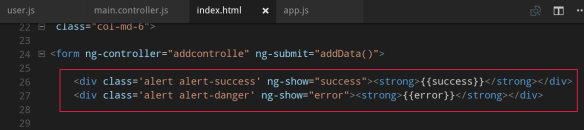
 Angular Application එකක් ඉතාම ලෙසියෙන් yeoman සග gulp භාවිතයෙන් හදගන්න පුලුවන්..එ වගේම express-generator හරහා express සහ node app එකක් හදගන්න පුලුවන්
ඉලග පොස්ට් එකෙන් table එක auto update වෙන විදිහ,edit සහ delete කරන විදිහ කියන්වා..දෑනට ඉවරයි…

superb one. keep it up
LikeLiked by 2 people
thanks bro
LikeLiked by 2 people
great work . keep it up
LikeLiked by 2 people
thanks bro
LikeLiked by 2 people
awesome
LikeLiked by 2 people
Thank you
LikeLiked by 2 people
superb one. keep it up
LikeLike
Thanko you
LikeLike
Thank you great work .
LikeLike
Thank you
LikeLike
Thank you great work .
LikeLike
Thank you
LikeLike
Thank you great work . Thank you
LikeLike
Thank you
LikeLike
Thank you great work . Thank you
LikeLike
Thank you
LikeLike
Thank you great work . Thank you
LikeLike
Thank you Thank you
LikeLike
Thank you Thank you
LikeLike
Thank you Thank you
LikeLike
Thank you Thank you
LikeLike
Thank you Thank you
LikeLike
Thanko you Thank you
LikeLike